Links and Resources

Monday, July 5, 2010

Punchy Party Planning

I hope you all enjoyed a wonderful summer weekend with the kids fresh out of school! Let the fun begin...

For us, we celebrated Canada Day (July 1st) with outdoor festivities, fireworks and of course outdoor food.  

I love outdoor parties and I enjoyed the last watermelon craft (treat holder) in the previous post soooo much....that I had to make more.  Lots more...

Card number one, in Melon Mambo and Garden Green.... 


The seeds are made from a scallop square punch, each scallop I cut at an angle like a teardrop and removed from the square.  You can also use a scallop circle (or any scalloped shape) to make tear drop shapes for seeds, eyes etc.

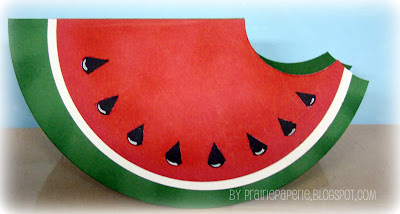
Next...CHOMP...nom nom....a watermelon card (or invitation) with a wee bite taken out (thanks to my circle punches)


A closer look at this one and you can see it is done with Riding Hood Red (a more masculine watermelon?)  and the seeds are arranged in a row across the melon. 

The seeds are highlighted with white gel pen.

The watermelon rinds are sponged with green ink to give it a more true to life effect.


Decorate your drinks!  Punch a little watermelon with your circle punches and sassy up those straws!  Bendy straws would have been better...but I have none...so we improvise.


Punch up those paper plates with some watermelon funfetti!  Okay so they are really only half circles of watermelon coloured circle punches...but they work very well! Cute!

Make a napkin ring/name card with your small circle punches and a ring of matching cardstock.  Leave out the seeds and you have room to write a name!

I hope you've enjoyed our little watermelon punch party!

xo.
D.

PS.  How did I get those round bottom cards to stand straight?  On the back of the card, the bottom edge is trimmed flat so that it doesn't tip and roll.  Have fun!
Punchy Party PlanningSocialTwist Tell-a-Friend

Tuesday, June 29, 2010

Watermelon Punch

School is out, summer is here and there's nothing else that screams "summertime" to me quite like a fresh piece of watermelon!

Watermelon reminds me of picnics, BBQ, fireworks, ball games in the park, kids in bathing suits....ahhhhh summertime...

Here's a little something you can whip up for your summer parties and festivities....a little watermelon treat box with a surprise inside! 

These would be cute at table settings, as birthday treats (really you can't go wrong with watermelon!)


This uses a few products from Stampin' Up! and assembles very quickly.  You'll need:
  • Top Note die for the BigShot
  • Scallop circle punch for the watermelon seeds (cut off each scallop)
  • Punch an oval out of the top to make 'handles' for your treat box
  • cardstock of your watermelon choice! (we have so many delicious cardstock colours to choose from)

For the middle you have options!  You can:
  • Use a small cut off gift bag
  • Use a mini lunch or food bag
  • make a gift bag from an envelope
  • use the box number 2 die for the BigShot
  • or make your own small box....
 I like options.  Options are always good. 

Now, for you papercrafty teachers out there...wouldn't this be a GREAT hostess gift with a little stamp and an inkspot?  Indeed!
Watermelon PunchSocialTwist Tell-a-Friend

Friday, June 25, 2010

Punch Art Rescue

If you follow along on Facebook you will have heard my pre- Dad's day grumbling that the sneaky peeker (husband) came into the craft room and caught me unawares.

No that's not code for anything romantic, honest! 

What did happen was he saw all of the delightful projects that had been prepared in advance of The Day.  So I (with a 5 year old running after me) had to think of something new (with a 5 year old talking a mile a minute)...

The first attempt was an epic fail (if I may quote the 12 year old of the house)...

And then I remembered seeing a punched art owl card SOMEWHERE...a magazine?  a blog?  It said 'hi' or something like that...could I find it anywhere so that I could run my desperate eyeballs all over it?  No. 

So this is the interpretation of that card (wherever it is) with all Stampin' Up! punches (which are fabulous and amazing).


Cute hey?  Whoo?  Who's the best dad in the world?  You Are!


I had a good laugh with the kids when I was gluing on this sleepy fella's eyes.  If you turn them so that the outer corners of the eyelids are facing up....he becomes a very cross owl (angry eyes!)....and if you leave the eyelids off entirely...a very startled and surprised fellow!

Have fun and get punchy!

You know who to call for all things stampy now dontcha'?  Just click here to go to my website for online orders!

I hope your Father's Day was great, ours was!

xo.
D


Punch Art RescueSocialTwist Tell-a-Friend

Wednesday, June 23, 2010

The Hoop-la (and my absence explained)

This is not paper crafty, but I beg you to not turn away...

I have been creating...

In the garage (of all places!)

Beautiful things...amazing things.... I posted this today on Twitter and Facebook.....


Do you know what it is?  Here's another....


You can really shaker yer booty to the pirates above....(hahaha, pirates...booty...get it?)


If I zoom out, you can SURELY tell what I'm up to now....


Hoops!  'Hula' hoops (but not your toy store hoop).  No siree! These are handmade hoops made to work for Everybody and Every Body! These are Cirque-ular Hoops (squee! That's me!).  

What's the hoop-la about these hoops? 
What you buy in a toy store is a toy.  It weighs a few ounces, it isn't sturdy, and it's slippery...and if you've tried one it likely fell to the ground a million times.  My handmade hoops are built for adults (and kids), for real life and have these perks:
  • They weigh 1-3 lbs (not that you can tell) and when they spin around your body it is easier to keep the 'swing' or 'flow' of the hoop moving.  Less drops! Great workout.
  • They all have a layer of grippy tape that helps keep the hoop at the spot on your body you are choosing to hoop at (chest, waist, hips, legs)
  • Custom sizes from 38" - 52" (and more).  Variety!!
  • Bigger is better (and hard to find..until now!) 
    • Let's face it, when you are five, you can spin a cheerio around your body with great success. 
    • As an adult we take up more space within a hoop, therefore it is harder to spin a small hoop around our bodies.  If you are carrying any extra weight (I am plus-sized) or are bigger of frame, or are an absolute beginner...YOU NEED A BIGGER HOOP! 
    • Bigger hoops spin a little slower and easier around your body.  You will be able to practise your movement and flow and ease into success!  Eg.  Think about spinning something around your finger (zip zip zip) try spinning it around your wrist, it slows down and you have to work harder to get it to go the same speed as around your finger, right?
  • Custom taping is available, so you get a hoop that you love.
  • Service packages available:
    • re-taping (if you need a change)
    • re-sizing (if you want your hoop cut down a size)

Why do I hoop?
Well, it's a pretty amazing (and personal story) but I'll lay it out there for you in short form.

As I mentioned, I'm plus-sized (very much so).  I have weight related issues that could eventually be compromising to my health and over the last year I've been working hard to make better lifestyle choices.  Lose weight.  Eat healthy.  Exercise.  

These are not easy.  I mean, I really struggle!!
I've lost some weight, I'm eating healthier...exercise has always been a challenge.  I have hip pain and lets face it...being as heavy as I am, I cannot do many activities with ease.  If the hip gets hurt, I'm down for a few days...this does not help me! 

From stage right...enters hooping...totally by accident....
I was randomly searching the Internet for 'fun fitness' or something and completely stumbled upon a video of someone hooping.  I'm not talking just at the waist.  It was crazy...over the head, under the leg, around the body..up down...around.  I was mesmerized.  I said 'what on earth is this'....and then I found another video, this one completely opposite of the first.  THIS video was calm, flowing, dance like, graceful and almost meditative. 

I was in awe that a HOOP could provide athletic exercise as well as calm relaxing movement.
I needed this in my life!  I showed my husband (who is a brilliant handyman and creator of things)  and he said he could make me one.  and...HE DID.  

It's been great.  I can do this exercise.  I can go fast and really work my core and my legs/hips/thighs.  I can go slow. I can exercise my arms with the hoop, I can use the hoop to stretch....and it doesn't matter what size I am because this hoop is built for my body, and I can make it do what I need it to do.  I love being in charge!

Guess what? I rarely have hip pain anymore!  Yesterday was the first day in about six weeks, but I had neglected my hooping routine for three days. Mhm

I've also lost about an inch on each thigh (yay!)

So...I've told you things you may find interesting, or maybe you didn't want to know! heh heh.  Maybe you're in the same boat and understand my frustrations and my celebrations?  Please leave me a comment!  I'd love to hear from you all.

And...if you've made it all the way to the end of this post, please be a friend and come say hello on our facebook page.  There are some great people there and I do post pictures and some videos.  I would love to meet you. Click the link: Cirque-ular Hoops.


Hugs!
D.


The Hoop-la (and my absence explained)SocialTwist Tell-a-Friend

Friday, June 4, 2010

Barbecue Punch Art (with faux cloud technique)

What do you do when you need a card for a dude or a dad and you've already used your masculine stamp sets to death?  They've seen them already! You're out of aces! 

You make punch art.  Yes you do! 

Punch art....because it's easy, it's WOW and you can create anything, really you can!


To create a BBQ or (grill) you'll need a large 1 3/4" circle punch, word window punch and a 1/2" circle punch.  That is it! 

Faux clouds in the background were done with the scalloped oval punch.

The grass was made by punching the scalloped border and then going back over it (offset) to make the ends 'spikey' and more grass like.  Voila. Man card.  Fast. Easy.  Me likey.

Shout out and thanks to all of the ladies who share their punched art with me through organized swaps and blogging we've received and given a lot of inspiration...and this BBQ saved my bacon....

speaking of bacon...

Doesn't that ribbon look like bacon?  Perfect :)


Barbecue Punch Art (with faux cloud technique)SocialTwist Tell-a-Friend

Monday, May 31, 2010

That Old Black Magic

What we do, when we do what we do, and oh we do it so well...

Let me mesmerize and tantalize you with our black magic spell...

Hey, it's my blog I can do lame poetry if I want, right? Okay, I'll knock it off.  What isn't lame is this, lookie.....


Isn't it beautiful?  Do you know what this is?

THIS, my lovely friends is the Black Magic Technique (or velvet Elvis painting as I like to call it).   Do you see the printing/script to the left of the art?  THAT is detailed instructions on how you do this beautiful technique....and THAT is what we do every month at Technique Club.  Oh yes!

Every month I get together with my Technique Club ladies and we make a 6x6" embellished page with the technique instructions, the sample of the technique (which they add to a 6x6" scrapbook)...

PLUS...we make two projects in addition to learning the monthly technique. 


It's a fun afternoon (or evening) out, and since they always leave with a detailed/sample of what they learned...they have a wonderful reference to keep and can reproduce everything at home!

It's brilliant, really, we have such a great time! 

If you're in the Edmonton area and want to join or start a techniques class with me as your instructor, please contact me through the links in the header of this blog, or pop over to the Prairie Paperie page on facebook and send me a message!

When you do visit the Prairie Paperie page on facebook you'll meet some lovely people and see a variety of projects and my latest classes and events. 

I've also posted this for the amusement and enjoyment of your eyeballs and inner craftmonster, isn't it pretty!  Details are on the facebook page, come join us and say hello and introduce yourself why don't ya?

That Old Black MagicSocialTwist Tell-a-Friend

Tuesday, May 18, 2010

Do It Yourself (DIY) Postcard

If you're a follower on the Prairie Paperie page on Facebook you may remember when I showed you this digital design that I made using My Digital Studio (and I promised to show you what it looked like made into a real postcard that you can mail!)


In the next photograph you can see that I've printed the graphic out on GLOSSY 4x6" photo paper on my home printer. (hurrah for the home printer!). 


Note: in my settings I always choose vivid colour in the printer controls.


When you flip over to the back side of the glossy photo paper you have a GREAT canvas for stamping.  The paper on the reverse side is matte and has a bit of a grain to it, so Classic Inks will adhere very nicely to this surface....


To get the visual layout of a 'real' postcard I drew a line down the center of the card with a Stampin' Write marker and a small ruler.


Tip:  Use lighter colour inks when working on the back of the postcard, because the photo paper is thinner than cardstock and you do not want it to bleed through to the front.

I used my Winter Post stamp set to stamp the "Post Card" image in Sahara Sand Classic Ink.

For the 'post marked' image in the right hand corner I used a Stampin' Write marker, in Sahara Sand,  and inked up everything but the middle of the circle (which had a Christmas sentiment inside)...this technique is called 'omitting'.  I huffed on the stamp to remoisten the ink and stamped it onto the cardstock.

Next I inked up a small heart stamp from Holiday Blitz and the XOXOXO stamped it within the circular part of the postmark image. To finish it off, I watercoloured the heart with a blender pen and a pink watercolour wonder crayon.


My Digital Studio software, and all stamping products mentioned are guaranteed available through my Stampin' Up! store through June 30, 2010. You can go to the store by clicking HERE.  

What happens after June 30...our new catalogue is released with some brand new stamp sets and colours!


I hope you enjoyed your tutorial on how to make a DIY Postcard! 


Just think of the possibilities you have with your camera, My Digital Studio, your laptop/computer and your home printer!


~Dreena~
Do It Yourself (DIY) PostcardSocialTwist Tell-a-Friend

Friday, May 14, 2010

3D Thanks!

A great big
(and I mean really big)
thank you to all my blog readers.

My blog is now over 5000 visits!

This goes out to you...

If you are a reader or a visitor would you please leave a comment and say "hi" maybe where you are from and how you discovered my blog?  (or just hi!) I'd love to know who you are!


I hand cut this bad boy with a hobby blade.  The proof is in the rough edges and awkward but beautiful hearts. Does anyone who specializes in 'fussy cuts' have tips you can share on how to cut around curves with a hobby blade?

Side note to my best friend: (Leigh if you are reading this I did NOT pick up a hobby blade...I hired trained professionals who specialize in the art of utilizing sharp utensils)....


I love this card, it was so fun to make and it's definitely a 'wow' item.  It is a HUGE card at 4x8" and when you open the card the word THANKS pops right out at you! BAM!  I like that...a bit of drama suits me fine!

~Dreena~
3D Thanks!SocialTwist Tell-a-Friend

Monday, May 10, 2010

Pretty Vintage Butterfly

Here's a quick and sneaky peek at what I'm working on....I've prepared this for the 90 beautiful stampers and scrappers who will be our team meeting/training event next weekend and I sure hope they love it!

It's all kinds of pretty when you see the whole thing, but I can't show you the whole thing...it's a secret.


I can tell you it uses the new Elements of Style stamp set from the new and fabulous Summer Mini Catalogue (which you can see on my website).  Click here.

It also uses the butterfly die for the BigShot machine (every household should have one of these...I'm not kidding).  Whether you papercraft, sew, quilt or work with metal...this machine is amazing.  It puts the 'zing' in the word amazing.  Trust me. 

Have fun creating!

~Dreena~
Pretty Vintage ButterflySocialTwist Tell-a-Friend

Monday, May 3, 2010

Vintage Mother's Day Card

Remember this?  Do ya?  If you caught my first (ever) video for Ruffled Grosgrain ribbon...this is the finished project.  Voila!

Don't tell my mom I've posted her Mother's Day card here...it's a secret...and we don't want to ruin the surprise right? 


I've been asked how I did the main flower...and it's so easy you're going to die....IT'S a STENCIL! 

Yes! From the Stampin' Up! Definitely Decorative line of products (decor elements and stencils).  This one in particular is part of a VERY LARGE (bigger than 12x12") stencil.   I just used one small portion and applied the ink with a sponge dauber.

I love finding new ways to use my tools, don't you?

The other highlight of this project (okay I confess I love the whole thing).....is this....


Can you see it?  It's the new vanilla SMOOCH Spritz from the Stampin Up! Summer Mini Catalogue. 

It makes me want to SMOOCH everything.  Everyone should SMOOCH.  Hurrah for Smooch-ing!
Smooch. ---okay I'll stop. Back to the card, the Vanilla smooch spritz adds a pearly, glowy and gorgeous shimmer to the whole project.  It is hard to catch shimmer or glitter with a camera, so you will just have to trust me that this is completely radiant in real life!

So, three things to remember.
  1. Go have a look at the new Summer Mini Catalogue and promotions on my retail website
  2. Stencils are awesome you can see the newest stencils and decor pieces on my website too (including fun and functional chalkboard decor elements) .....really, these are so cool!
  3. Smooch, you know you wanna....
Join us on the Prairie Paperie Facebook page - Something fun happens when we reach 500!

If you enjoyed this blog post, please SHARE and test drive my "Tell a Friend" link at the very bottom of this post. 
Vintage Mother's Day CardSocialTwist Tell-a-Friend

Friday, April 30, 2010

Inspiration - A CREATIVE Challenge

Earlier today I threw down a CREATIVE challenge on the Prairie Paperie Facebook page to my readers and I want my blog readers to get in on the fun too!

The challenge springs forth from yesterday's blog post where I shared a card that I made.  You can read the blog post here (right after you finish reading this one!).

Here's the challenge:

1. Find something in your environment that inspires you, that pleases your eyes.

Good examples of places to look are:
  • signs
  • packaging
  • clothing
  • magazine ads
  • patterns in textiles
  • decorating
2. Figure out what you like about it?  The colour? The shape?....take note of these things...jot it down.

3. Translate the things that you like from your inspiration piece into a scrapbook page, a scrapbook layout or a card.

4. Go to the Prairie Paperie Facebook page and share you creative challenge piece!  Please leave us a photo and a comment....if there is a story, please share your story as well as your pictures! 

5. Not a Facebook user? No problem! Leave us a link to your creation here (using the Mr. Linky widget) so that we can go to your blog or online posting and leave you a comment!  (please ensure that you leave the direct link to the posting of your project, as we don't want to have to hunt for it!)

This was my inspiration piece...a portfolio from on of the schools in my city.  Here I just want you to notice the funky, retro look to the art, the modern and fresh colours, the cute bird....


Here is a close - up of the finished card


  • I did my best to colour match (in real life it is VERY close). 
  • I kept with the same layout, put my sentiment where they used a slogan or logo....
  • I 'cartoonized' my edges by distressing them/swiping them over my black ink pad...

I'm all kinds of happy about this!

So, what do you think?  Are you ready to play, want to take the CREATIVE CHALLENGE? 

Don't forget to visit the Prairie Paperie facebook page and become a fan....something fun happens when we reach 500. 

Itty bitty bit of groovy...there is a new widget near the bottom by the comments. It's a little tiny toolbar that enables you to instantly 'share'  my blog posts with others in your favourite social networks! It's itty bitty and down near the comments...please let me know if you use it, and if you like it.  Your feedback is important to me!

Inspiration - A CREATIVE ChallengeSocialTwist Tell-a-Friend

Thursday, April 29, 2010

Inspiration is Everywhere! The tale of a funky fresh card...

First let me start this post by apologising for the photos.

They didn't mean to be blah...it's just that they couldn't get ready for you because their photo editing software was inaccessible.

They really wanted to spruce up, polish up and make themselves amazing for you...but we decided that rather than make you wait indefinitely for their appearance (which I had already been teasing you with on Facebook) we'd better just make do and get 'er done!

So...inspiration is everywhere, it really is!

My youngest is getting ready to attend school and as many parents know...you go to ALOT of open houses and schools with hopes of finding 'just the right one'. We were recipients of many information packages, hand outs, brochures, business cards etc. Most of them very blah, boring, get the job done kind of things....and then this one....

.....It whispered sweet things into my ears, pitched woo like (all I can think of is... like my coffee to my lips in the morning...lame!).....

I almost squealed and didn't want anyone to touch it. It was perfect! The colours, the arrangement, the funky styling, the little sassy bird!! (I'm still a bit giddy, forgive me).

I knew immediately that I could translate it into Stampin' Up! colours, shapes and materials. I had so much fun.

On the top right we have the portfolio folder from a very lovely school, and the bottom left...a picture of the folder with his new little Stampin' Up! friend....


SQUEE! Aren't they a perfect pair?

Can you see how I used the same basic layout from the portfolio? I'm tellin' ya people, if a graphic artist has gone through all the work making something look this pretty...you need to follow their lead!!!

I'm going to make more of these. What do you think?

This is just a subtle hint...but you have another challenge coming at you shortly...


Dreena
Inspiration is Everywhere! The tale of a funky fresh card...SocialTwist Tell-a-Friend

Friday, April 23, 2010

Roundup - I Want Candy

Here it is!

Thank you to everyone who participated in the
"I Want Candy" colour challenge in March. We had the deadline open for almost the entire month and we received a GREAT VARIETY of projects to share.

You all created beautiful samples and I wanted to do something fun and pretty to showcase your creations...

I used flowers and soft colours from the Candy challenge inspiration piece we saw back in March and turned your submissions into a bouquet of pretty spring posies! Have a look...


In randomly selected order from 1-8...I present to you the lovely creations of:
  1. Lori-Anne
  2. Sharon
  3. Hanway Ink
  4. Lori-Anne
  5. Leslie (CrookedStamper)
  6. Paper Batty
  7. Kerri
  8. Leslie (CrookedStamper)
Please click on the linked names and go view the projects large and beautiful! While you're visiting..share some love and leave a comment. We like comments.

Thanks for visiting, and thanks for participating!

Dreena
Roundup - I Want CandySocialTwist Tell-a-Friend

How to Ruffle Grosgrain Ribbon - a video tutorial

Hey stampers and blog readers, I've got something new and exciting to share with you today.

Are you ready?

Am I ready?

(drumroll please)

Now presenting...my first video EVAH! I'm really quite excited about it, as I'm sure you can tell. Woot!

So without further ado, here it is..the inaugural video in my Techniques 2 You series (do you like the name?)

Please be gentle...and I hope you enjoy it.

*Extra credit goes out to Leigh's tripod, without dear LT we wouldn't have been able to film this video.

How to Ruffle Grosgrain Ribbon - a video tutorialSocialTwist Tell-a-Friend

Tuesday, April 13, 2010

You Gotta Have Faith

Edited to Add:  Due to a large response from people who do not live in the area but wished they could take the classes, I am currently developing a plan to offer Faithbooking as an online class option.  

If you are interested in this class please leave me a comment or email me through the contact button on this blog and I'll be able to keep you informed.  You can also follow me on Facebook as Prairie Paperie for updates and to send me a message.


A few years ago I was very shy, very reserved (it's true!) and feeling creatively, spiritually and emotionally exhausted.

I found myself in contemplative prayer, after an interesting chapter in a Robert Fulghum book I was reading. I was wondering some of those 'mother phrases' (you know the things you mom may have yelled at you when you were little)?

 Oh you know what I mean...just say these like your mom is giving you what-for...

  • What on Earth do you think you're doing?
  • Who do you think you are?
  • What have YOU done?
You follow me now right? Ha!

So I prayed about these things, I wrote about these things, I journaled about these things.
What AM I doing here (on Earth?). What is my purpose? What are my talents, my gifts? Who DO I think I AM? What have I done...what will I do...who will I be...
Pretty huge? Yes, I thought so. How does this relate to papercrafting?

When you pray, God does listen.
If you ask Him these things, He will start to tell you. Believe me, you'd better listen because you are in for the ride of your life.
I was invited to a Stampin' Up! workshop, and I didn't even want to go, I hated the idea of papercrafting. GASP! However, I went...and I had a number of 'wow' moments that night. (It's a pretty cool story).
Within' 6 months of that party I was teaching crafting classes (remember I'm shy!) to complete strangers, to new friends, to old friends. I had a new business. New purpose. Direction....and then a new seed was planted. I was praying and I heard Him remind me that I had asked HIM to show me my gifts, my talents so that I could lead a purposeful life. I arrived in that moment and knew that I was meant to teach a faith-based series of scrapbooking classes.

  • Are you interested in learning answers to your Mother Questions?
  • Do you want to have fun and explore these topics (and more) in a group?
  • Do you want to encourage others?
  • Do you want to document this exploration of self and your Faith in a beautiful, fun and fresh way?
  • My faithbooking classes will allow you to start a fun, focused and uplifting journey (and learn a new hobby/craft), I invite you to join me.
If you have a home-group, church, or just a group of friends who would like to start faithbooking please email me by clicking on contact links above.

You can also send me a message on Twitter! My twitter account is @prairiepaperie

You can also join me on my facebook page Prairie Paperie, come say hello!

~Dreena~
You Gotta Have FaithSocialTwist Tell-a-Friend

Saturday, March 20, 2010

Easter Bunny Carrots


Don't you just love a card that is a little bit different from the usual?

I do! Stamps just give us such versatility with creation...if you can think it/dream it, chances are you can find something to make it.

Without further ado I give you the Easter Carrot:


So the carrot is actually made using the Pick-a-Petal stamp set!

When you look at the set, all you think of (as the name suggests) are various petals to make flowers. Isn't it more fun to think outside of the box though? YES IT IS!

MINI TUTORIAL:

1. Inked the solid petal image from Pick-a-Petal with pumpkin pie classic ink

2. Take a blender pen and remove colour from the stamp (the lines/striations)

3. Clean the pen tip on a scrap paper, go back and remove more colour... (I repeated until I had a fairly decent looking carrot)

4. "Huff" and stamp on whisper white cardstock.

VOILA! Carrot! Stinkin' cute hey? I know. I squealed...

Next steps...


For the leafy greens on the carrot:

  1. I've used the filigree from the Baroque Motifs stamp set
  2. Inked up only a small PORTION of the stamp with a Garden Green Stampin' Write marker (this technique is called OMITTING).
  3. "huff" or breathe on the stamp to re-moisten the ink
  4. line up your stamp with the top of the carrot, and press down.

You have just created the most cute and whimsical Easter Carrot! You rock with your uniqueness!

Speaking of uniqueness, please be sure to check out more Easter Carrots here: The Crooked Stamper, my dear Twitter friend Leslie made an irresistable card that was a springboard for my own carrot creation!

Other things that are groovy about this card:

  • the FREE scallop trim border punch (FREE with a $65 dollar order from my online store because it's Sale-A-Bration! until March 31)
  • The polka dot dry embossing (a BigShot embossing folder)
  • The Easter sentiment which is a NEW clear mount stamp from the Occasions Mini catalogue.
  • all of these things and more can be seen on my website (links on sidebar)
  • Questions? Contact me Links are on the top of the page!

Stamp Happy and go make something pretty now!

Dreena

Easter Bunny CarrotsSocialTwist Tell-a-Friend

Wednesday, March 10, 2010

Shabby Chic Gift Box

Shabby Chic is not something I do very often. Usually because I feel that once I've 'shabbied' (is that even a word?) that I've gone too far and lost the Chic. I can't be the only one who feels this way?!

Anyways, I saw a cute box idea, and this beauty actually folds flat and pops open. It's 4x4" so you can use it as an awesome gift box, jewelery box, treats, cards.....(keys to a new car? Diamonds <--you never know, my husband COULD read this right?)


The flower is made from Bella Blue designer series paper! I love this technique for making flowers... (and my stamp club members will be learning how to do this next week!)

I distressed the corduroy button with Night of Navy ink...and used a sponge dauber on the flower to apply a bit of distressing with the same ink. I also stamped the textured chocolate chip paper and the kraft paper with the filigree from the Vintage Vogue stamp set.


This is the side view of the box as it's being folded flat. Neato! I kid you not when I say this box is amazing!!

So...what do you think?


Not too shabby? (bwaha!) If you know me...you KNEW I was going to slip that joke in...sigh. I love words (but not as much as this box!) Really, I don't think I went too far with the shabby...it's still a bit elegant.

Did you spy that teeny little rhinestone?

It's one of the sticky back rhinestones (which come on a 6x6 SHEET of goodness) in the Eggcellent Eggs Kit (for $13.25)! Did you know when you shop in my online store on my website you get preferred customer pricing 10% savings? Oh yes you do! (click here).

You can do so much more than JUST Easter with this kit. I'm not just fluffing your feathers when I tell you "chickie, you need this kit".


Here's the product shot of the Vintage Vogue stamp set. Available in clear mount or traditional wood mounted rubber.


Isn't this just all kinds of pretty? Wood mount is $31.95 and Clear is $23.95 (preferred customer pricing on my website).


Note: I've been redesigning my blog to make it easier for you to find the information you need. Please feel free to use the links on the right hand sidebar to visit my website where you will find:
  • projects for inspiration
  • product information
  • shopping
  • my calendar and links to book your own classes and parties
  • Links and information to join my Stampin' Up! group and start your own business!
I've also got tabs up at the top/header...where you can click to contact me and more.


Please feel free to comment on my new blog design and I'm open to suggestions!


Have fun stamping!


~Dreena
Shabby Chic Gift BoxSocialTwist Tell-a-Friend

Giraffe!

This is one of those cards that can really be anything, for any occasion, and THOSE are the best kind of cards! I love the flexibility that stamping offers!

Let me tell you about this card.

First of all, I'm a technique junkie and I never get bored with stamping, I love learning new things...see the plaid background, that's not a fancy shmancy paper...OH NO...I did that. Me. It's my 'faux plaid' technique...well I'm sure there could be many names and I don't claim to be the inventor of this...it's really just playing with chalk pastels and scrap paper...but here on this card...it's all mine!! (PS. my contact info and class schedules will be on my Stampin' Up! website HERE)


Now, take a peek...look reallllly close at that Giraffe too....


The Giraffe is from the new Fox and Friends clear mount stamp set (which is ONLY $19.95) seriously, you need this stamp set (or I'm not talking to you).


You can stamp baby cards, fun cards, birthday cards, romantic cards...YES, EVEN romantic cards with this set. This giraffe could be saying "wanna neck" very flirtatiously with it's husband or wife. OK, if that's not to your liking it could be saying 'thank you for always sticking your neck out for me'. It is always good to thank people, it's the right thing to do! Why not do it with a giraffe?

See the spots on the giraffe's neck? Those are itty bitty teeny weenie hearts that were left over from punching with my "pinking hearts" border punch. I applied them all ever so lovingly with glue and tweezers.

The yellow card stock is dry embossed with the BigShot 'Perfect Polka Dots' embossing folder. I can't tell you how much I love that machine! Do you have a BigShot? Don't you just LOVE the embossing folders? Squee!

The ribbon was a cute little trick I learned from Mary Dawn's blog 'My Pink Mexico' (and my friend Kerri) thanks ladies! Now, last but not least...the four 'quilt squares' behind the giraffe are punched scallop squares.

Cutie patootie. I love this card. It makes me smile.


PS. Lori-Ann, does this qualify as a submission to my own colour challenge (wink)...it's pretty close? I think it does!!

Giraffe!SocialTwist Tell-a-Friend

I WANT CANDY - Enjoy the Little Things Colour Challenge

It's time for another crafty colour challenge!

Sorry it's taken so long to post an inspiration picture....I kept waffling back and forth and I was quite indecisive about what the next colour challenge should be.

I wanted something different from the last batches of colour and I wanted to stay away from MY personal 'go to colours'...which always seem to be chocolate and "insert colour here".

I said out loud to myself (and I'm so pathetically food centric) "what do I like other than chocolate..?" and then my inner-self replied "candy". I know, right? <--pathetic!!

So I give you the "I WANT CANDY" or "ENJOY THE LITTLE THINGS" colour challenge. OH and since candy is little, that's why you should have several. I'm just sayin....


So you have two weeks to submit your crafty goodness using the following colours:
  • pretty in pink
  • almost amethyst
  • apricot appeal
  • barely banana
  • sage shadow
  • whisper white (not listed but always accepted)

You do not have to use ALL of the colours listed, but be assured that if you DO...I will totally be WOW-ed. You will have wow-ed me.

OH, and see that little crown on the bubble gum wrapper...if you manage to work in a crown into your project(s)...I will be SUPER WOW-ed.

So who remembers the song "I Want Candy"? Who's got that going through their head now? What is your favourite candy? I'm curious...talk to me, leave me comments!

For those of you playing in the challenge, the deadline will be March 28, 2010 ( I'm feeling generous with time!!). Go crazy! Go create!

Please remember to submit a DIRECT link to your project (not just your blog address, but the link to the atual post that you want us all to admire!). If you don't blog, no worries...you can use a photo site such as Flickr or if you've posted to a gallery like Splitcoast Stampers...just hook us up through there!

Happy Creating! Please use the submission tool here:


I WANT CANDY - Enjoy the Little Things Colour ChallengeSocialTwist Tell-a-Friend